Imagine the delightful taste of a homemade pie, but in a perfectly portioned, grab-and-go package that's as easy to eat as it is to make. That's the magic of strawberry hand pies! These charming treats are a fantastic solution for busy families, offering all the joy of a classic fruit pie without the need for plates and forks. They're especially popular with children, who can easily hold them and enjoy a sweet, fruity snack without interrupting their playtime. Our comprehensive guide will walk you through creating a truly memorable strawberry hand pies recipe, perfect for any occasion.
Homemade strawberry hand pies are more than just a dessert; they're a versatile snack, a delightful breakfast pastry, or a welcome addition to any picnic basket. They're convenient to make ahead, easy to freeze, and simply irresistible when bursting with sweet, jammy strawberry filling encased in a golden, flaky crust. Get ready to bake a batch of these portable delights that are sure to become a family favorite!
Mastering the Strawberry Filling: Sweet, Jammy Perfection
The heart of any good hand pie is its filling, and for strawberry hand pies, that means showcasing the vibrant flavor of fresh (or frozen) strawberries. Achieving that perfect balance of sweetness, tang, and jammy texture is key. There are a couple of excellent methods to create your irresistible strawberry filling, each offering slightly different nuances.
The Choice: Stovetop Simmer vs. Roasted Intensity
You have two fantastic options for preparing your strawberry filling:
- The Quick Stovetop Simmer: This method, ideal for its speed and simplicity, involves combining chopped fresh strawberries with granulated sugar and cornstarch in a saucepan over medium heat. As you stir, the strawberries will release their juices, and the cornstarch will work its magic, thickening the mixture into a luscious, jam-like consistency in about 10 minutes. This approach is straightforward and yields a bright, fresh-tasting filling. Once cooled, a touch of lemon zest is stirred in, adding a delightful zesty brightness that cuts through the sweetness.
- The Roasted Flavor Intensifier: For those seeking an even deeper, more complex strawberry flavor, roasting the fruit is a game-changer. Roasting strawberries with sugar concentrates their natural sweetness and sugars, creating a richer, almost caramelized jam. This process brings out an incredible depth that a simple stovetop simmer might miss. If you're using in-season, super sweet local strawberries, roasting will elevate them to new heights. Even frozen strawberries benefit immensely, though they may require a bit longer in the oven due to extra moisture. If you want to unlock intense flavor: roasted strawberry hand pies recipe, this is the way to go.
Secret Ingredients for Maximum Flavor
Regardless of your chosen cooking method, a few key ingredients elevate your strawberry filling:
- Fresh Strawberries: Of course! Aim for ripe, sweet berries. While fresh is always best, especially when in season, frozen strawberries work perfectly well. Just be aware that frozen berries release more water, so either method might take a bit longer to thicken.
- Granulated Sugar: Beyond sweetness, sugar interacts with the fruit's pectin to create that wonderful jammy texture. You can adjust the amount slightly based on the sweetness of your berries and personal preference, but generally, half a cup is a good starting point for a pound of strawberries.
- Cornstarch: This is your thickening agent. It ensures your filling holds its shape and doesn't make your hand pies soggy. Three tablespoons for a pound of strawberries usually does the trick.
- Lemon Zest: A teaspoon of finely grated lemon zest (added after cooking and cooling) provides a crucial bright counterpoint to the sweetness, making the strawberry flavor pop.
- Vanilla Bean or Extract (Highly Recommended!): This is where true magic happens. As noted by culinary experts, vanilla and strawberries are an exceptional pairing. When cooked together, vanilla (especially a scraped vanilla bean or a teaspoon of quality extract) enhances the strawberry's natural sweetness and adds an incredible aromatic depth. It's a simple twist that transforms a good filling into an extraordinary one.
For the basic filling, you'll need: 1 pound strawberries, chopped; 1/2 cup granulated sugar; 3 tablespoons cornstarch; 1 teaspoon grated lemon zest.
Assembling Your Flaky Hand Pies: Dough, Fill, & Seal
Once your delectable strawberry filling is cooled and ready, it's time to bring your hand pies to life. The crust is just as important as the filling, providing that essential flaky contrast to the soft, sweet interior.
Selecting Your Pie Dough: Convenience Meets Quality
The "easy homemade" part of our strawberry hand pies recipe often comes down to the dough. While making pie dough from scratch can be a rewarding experience (and you can explore secrets to flaky strawberry hand pies: butter & vanilla boost for tips), using refrigerated, store-bought pie dough is a fantastic shortcut that doesn't compromise on taste or texture significantly for a casual treat.
- Refrigerated Pie Dough: This is the ultimate convenience. Two circles of high-quality refrigerated pie dough are all you need. Look for brands known for their buttery, flaky texture. Keep the dough cold until you're ready to use it, as this helps with flakiness.
- Homemade Pie Dough (Optional but Recommended for Flakiest Results): If you have the time, a homemade all-butter pie crust elevates these hand pies even further. The key to flakiness is cold unsalted butter cut into the flour, with just enough ice-cold water to bring it together without overworking the dough.
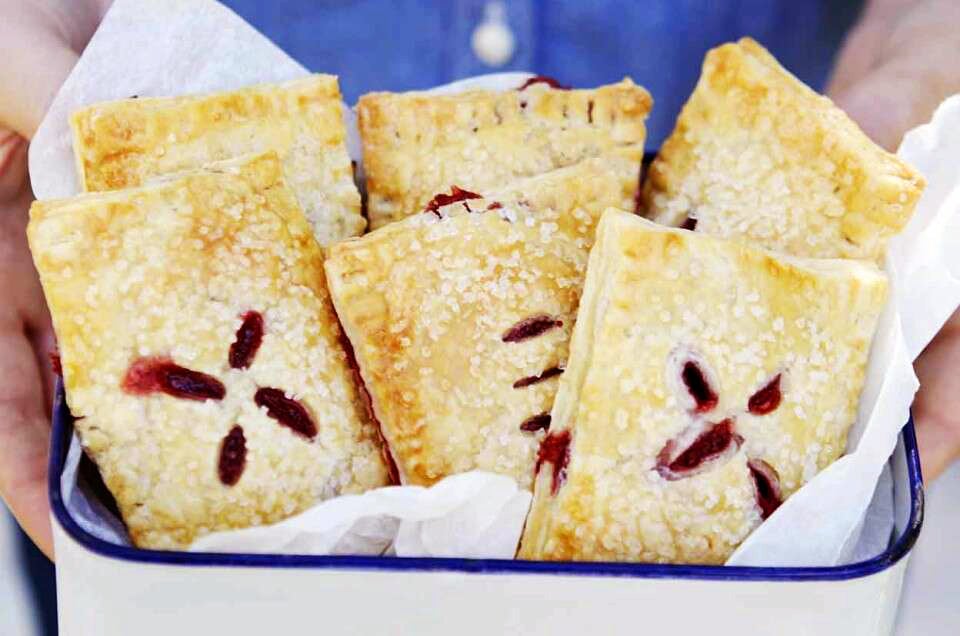
You'll also need: All-purpose flour, for dusting; 2 circles refrigerated pie dough; 1 large egg, lightly beaten; 1 tablespoon milk; 2 tablespoons turbinado sugar.
Step-by-Step Assembly for Picture-Perfect Pies
Before you begin, preheat your oven to 375 degrees F (190 degrees C) and line a baking sheet with parchment paper. This prevents sticking and makes cleanup a breeze.
- Prepare Your Dough: On a lightly floured surface, gently roll out your refrigerated pie dough circles a bit thinner, if desired, to ensure maximum flakiness. The goal is to create large, even squares. Trim the rounded edges to form two large squares, then cut each large square into four smaller, roughly equal squares. You should end up with eight squares of dough.
- First Layer: Place four of these dough squares onto your prepared baking sheet, spacing them out to allow for expansion.
- Fill 'Er Up: Spoon about 2-3 tablespoons of your cooled strawberry mixture into the center of each of the four dough squares, leaving a clear border of about 1/2 inch around the edges. This border is crucial for sealing.
- The Egg Wash Seal: In a small bowl, lightly beat one large egg with a fork. This egg wash will act as the "glue" for your hand pies. Lightly brush the edges of the dough squares with the egg wash. This helps create a strong seal and prevents the filling from escaping.
- Top Layer & Seal: Carefully place the remaining four dough squares on top of the filled squares, aligning the edges as best you can. Use the tines of a fork to firmly press and seal the edges all around, creating a decorative crimped border. This not only looks pretty but also secures the filling.
- Ventilation is Key: In the center of each hand pie, use the fork to create a small vent (a couple of punctures or a small slit with a knife). This allows steam to escape during baking, preventing the pies from bursting and ensuring a perfectly cooked filling.
- The Golden Finish: In another small bowl, whisk the remaining lightly beaten egg with 1 tablespoon of milk to create a second egg wash. Brush the tops of all the hand pies with this mixture. This will give them a beautiful golden-brown sheen when baked. Finally, sprinkle generously with turbinado sugar. The coarse sugar adds a lovely sparkle and a delightful crunch.
Baking & Beyond: Golden Crusts and Happy Kids
With your strawberry hand pies assembled and adorned, the final step is to bake them to golden perfection. This is where the magic truly comes to fruition, transforming simple ingredients into delightful, portable treats.
Achieving That Irresistible Golden Finish
Place your prepared baking sheet in the preheated oven. Bake for approximately 30 minutes, rotating the baking sheet once halfway through to ensure even browning. You're looking for a beautiful golden-brown crust that indicates crispness and a perfectly cooked filling. If your oven has hot spots, keep an eye on them and rotate as needed. Once baked, carefully transfer the hot hand pies to a wire rack to cool completely. Cooling is important for the filling to set properly, preventing it from being too runny when you take that first bite.
Why Hand Pies are the Ultimate Kid-Friendly Treat
This strawberry hand pies recipe truly shines when it comes to pleasing the younger crowd. Here's why they're such a hit:
- Portability & Less Mess: Unlike a traditional slice of pie, hand pies are designed for tiny hands. There are no plates or forks required, meaning less mess and more independence for kids. They can grab one and go, perfect for picnics, school lunches, or a quick snack during playtime.
- Perfect Portions: Each hand pie is an individual serving, making portion control easy and preventing waste.
- Freezer-Friendly: Make a large batch and freeze them! Once cooled, wrap individual hand pies tightly in plastic wrap and then place them in an airtight container or freezer bag. They can be frozen for up to 3 months. To reheat, simply pop them in a preheated oven (from frozen) at about 350°F (175°C) for 15-20 minutes, or until warmed through. This convenience makes them ideal for busy weekdays.
- Kid-Approved Flavor: Strawberries are almost universally loved by children. The sweet, fruity filling combined with a buttery, flaky crust is an irresistible combination.
- Involve the Little Bakers: Getting kids involved in the kitchen is a wonderful way to teach them about food and build confidence. They can help chop softened strawberries (with supervision), spoon filling, brush on the egg wash, or sprinkle the turbinado sugar. It makes the final treat even more special.
Storage and Serving Tips
While these hand pies are best enjoyed fresh, still slightly warm from the oven, they also keep well. Store any leftover hand pies in an airtight container at room temperature for up to 2-3 days, or in the refrigerator for up to 5 days. They can be gently reheated in a toaster oven or microwave for a few seconds if desired. Serve them as an after-school snack, a delightful addition to a brunch spread, or pack them into lunchboxes for a special surprise.
And for those moments when you're feeling adventurous, don't hesitate to experiment with different fruit fillings! Apples with cinnamon, mixed berries, or even peaches can be wonderful alternatives using this same basic hand pie structure. The possibilities are endless!
There you have it – a comprehensive guide to crafting the most delightful and easy homemade strawberry hand pies. With their irresistible flavor, convenient size, and family-friendly appeal, this strawberry hand pies recipe is destined to become a staple in your kitchen. So gather your ingredients, enlist your little helpers, and get ready to enjoy these portable, delicious treats!
